
What is user story mapping?
User story mapping is a design method that creates a visual backlog that everybody understands. This method became popular after Jeff Patton's well-known book User Story Mapping. It’s also a simple way to understand user needs and create user-centric products.
Why is user story mapping so popular, and why is it said to be the "visual backlog that everybody understands"? It focuses on the user persona and its journey through the product — what does it do when using the product? We call user story mapping a user-centric method because it starts with collecting the persona's goals and all the steps the user takes using the product. Everything is arranged in the narrative flow from left to right - so it's easy to follow and understand, ultimately enhancing the user experience.

How to make a user story map
step by step?
User story mapping sessions can be organized on an office whiteboard using sticky notes to build the user journey and collect user stories. If your team is new to user story mapping, then try the following user story mapping exercise before jumping into the real work:
Map the morning routine: It is easy to collect the main goals (e.g., getting a morning coffee, etc.), and then you can break down the main activities into smaller steps.
Map a bit complex event, e.g., preparing for the holiday, dating, etc.
Map a well-known product the team uses (e.g., team chat, social media app).
Step 1: Define user personas
Let's start with the user persona. We recommend starting with one (the most typical) user persona and then moving to the next steps. Later, you can collect more user personas and go through the user story mapping process.
Describe the main users of your product or service in the following ways:
provide a short intro about the user
describe the user goals
collect pains, problems that should be solved
Example
Let's start with Marie who's planning the family holiday and wants to book a hotel room.

Step 2: Discover user goals
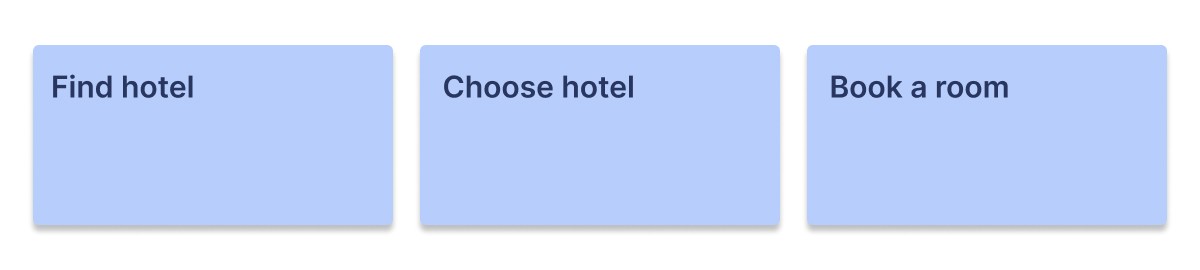
If we get the first user persona, we can break down the information we included in the user goals section into activities. User goals should be written into sticky notes or virtual cards. Focus on what the user wants to achieve (e.g., find a hotel), not on their steps (e.g., opening the website).
Example
Our solution for Marie is a website that helps her book a hotel room. To solve this goal, she wants to Find hotels or accommodation opportunities to choose from. Then - comparing possibilities, she wants to Choose a hotel and, finally, Book a room.
Step 3: Map the user journey (customer journey)

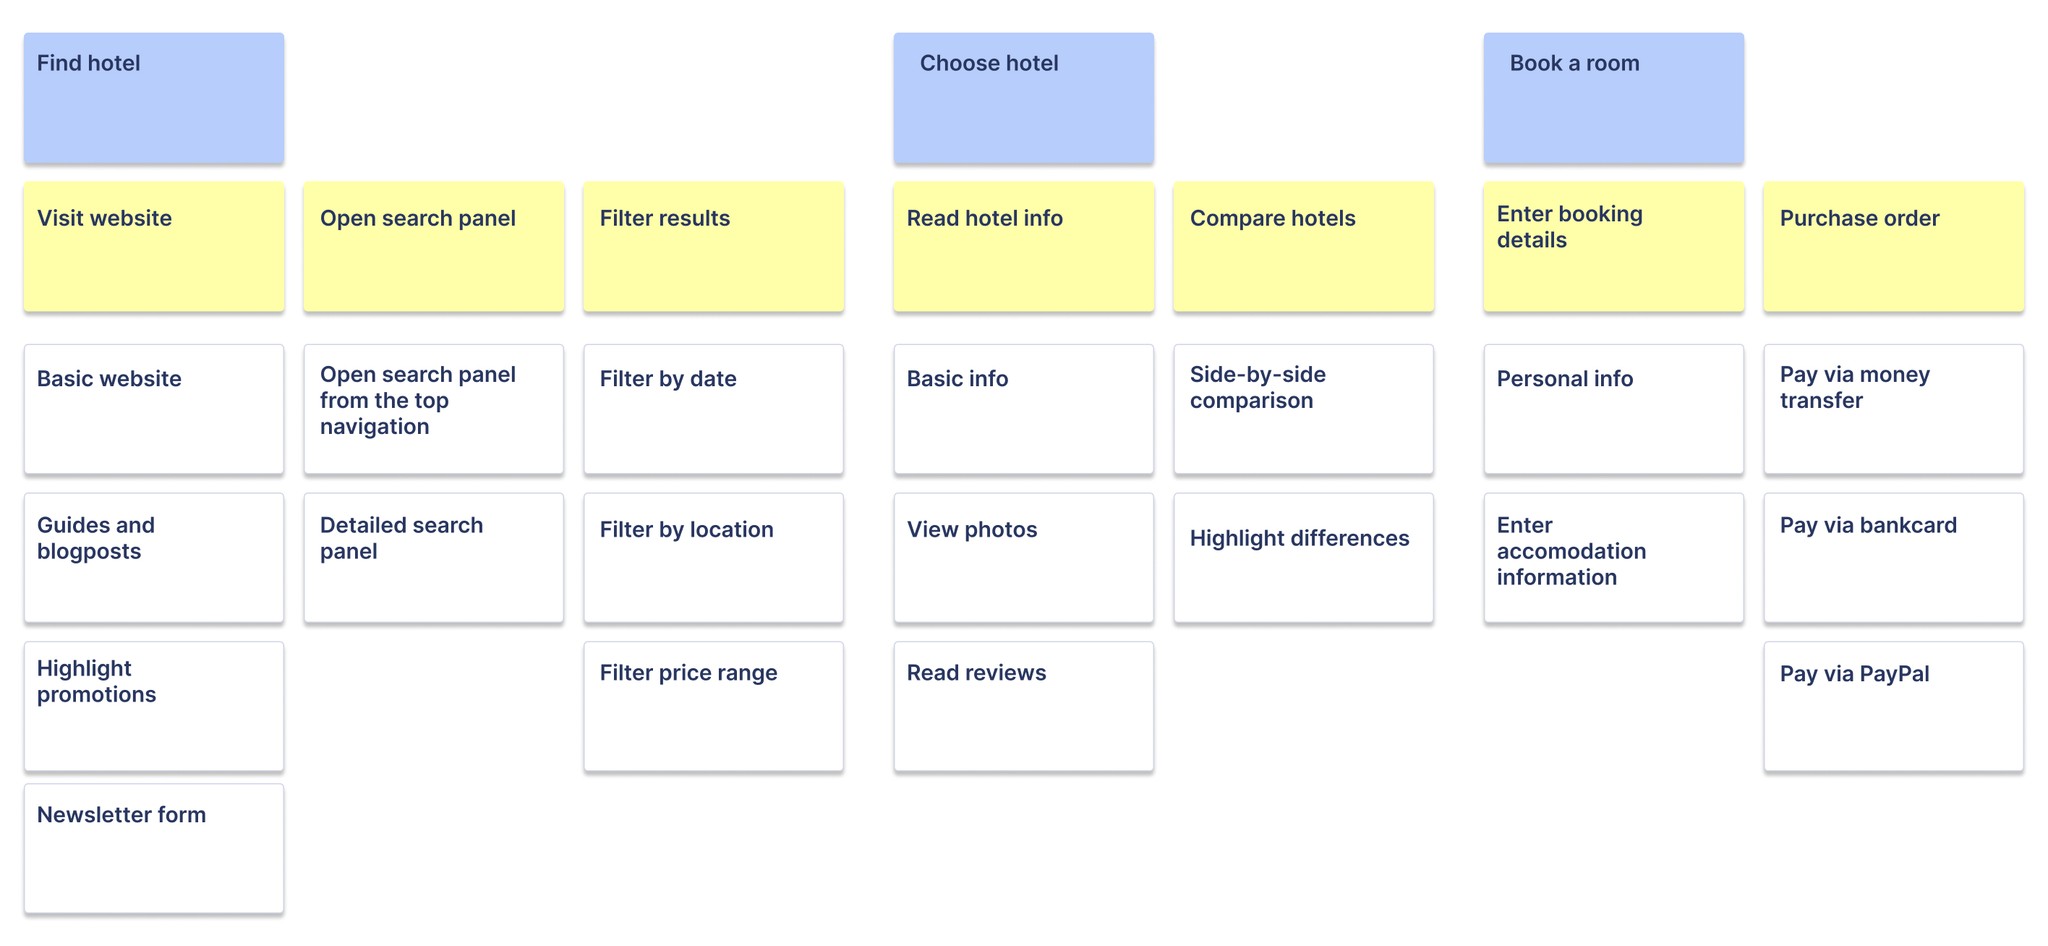
Step 4: Write user stories
The next step of the user story mapping session is to find solutions to achieve the user steps. Through this process, you create "user stories". Generally, you can use the standard user story format:
As a <user persona>, I want <goal>, that <benefit>.
To keep virtual or physical sticky notes short and easy to understand, we recommend shortening the user story format when writing the user story title by removing the repeating parts:
As an impulse shopper, I want to see the daily offers to get the best discounts. -> See daily offers
Try to collect as many stories as possible for each user's step, but don't stick to a single step—otherwise, the user story mapping session will become extremely long. The best and most important user stories will pop up first, and you can start another discovery session later on.
Example
Let's pick the step 'Apply filters'. If Marie has the idea of where to go and at what time, then it leads to the Filter by the time and Filter by location. Plus, Filter by price range is also helpful when having a budget.
Step 5: Prioritize your backlog
If the team was successful during the user story mapping session, the backlog should be full of great ideas! User stories have different priority levels. Identify the most common behavior or the basic solution to the problem.
Organize user stories by priority and place the most essential card at the top of the column. If you're working with external clients, discussing priorities with the customer is crucial, so be sure to stay connected with your partners.
Example
Focus on the first step — Visit main page. The brainstormed user stories are the following:
Basic website
Guides and other blogpost
Highlight promotions
Subscribe for the newsletter form
Consulting with the client, it was clear that the Basic website is a must, so this is the top priority. The service is brand new so building an email list is crucial — that's why the client decided to move the Newsletter form to the second place. After that they decided that the Highlight promotions would deliver more business value (in short time) than writing blogposts.

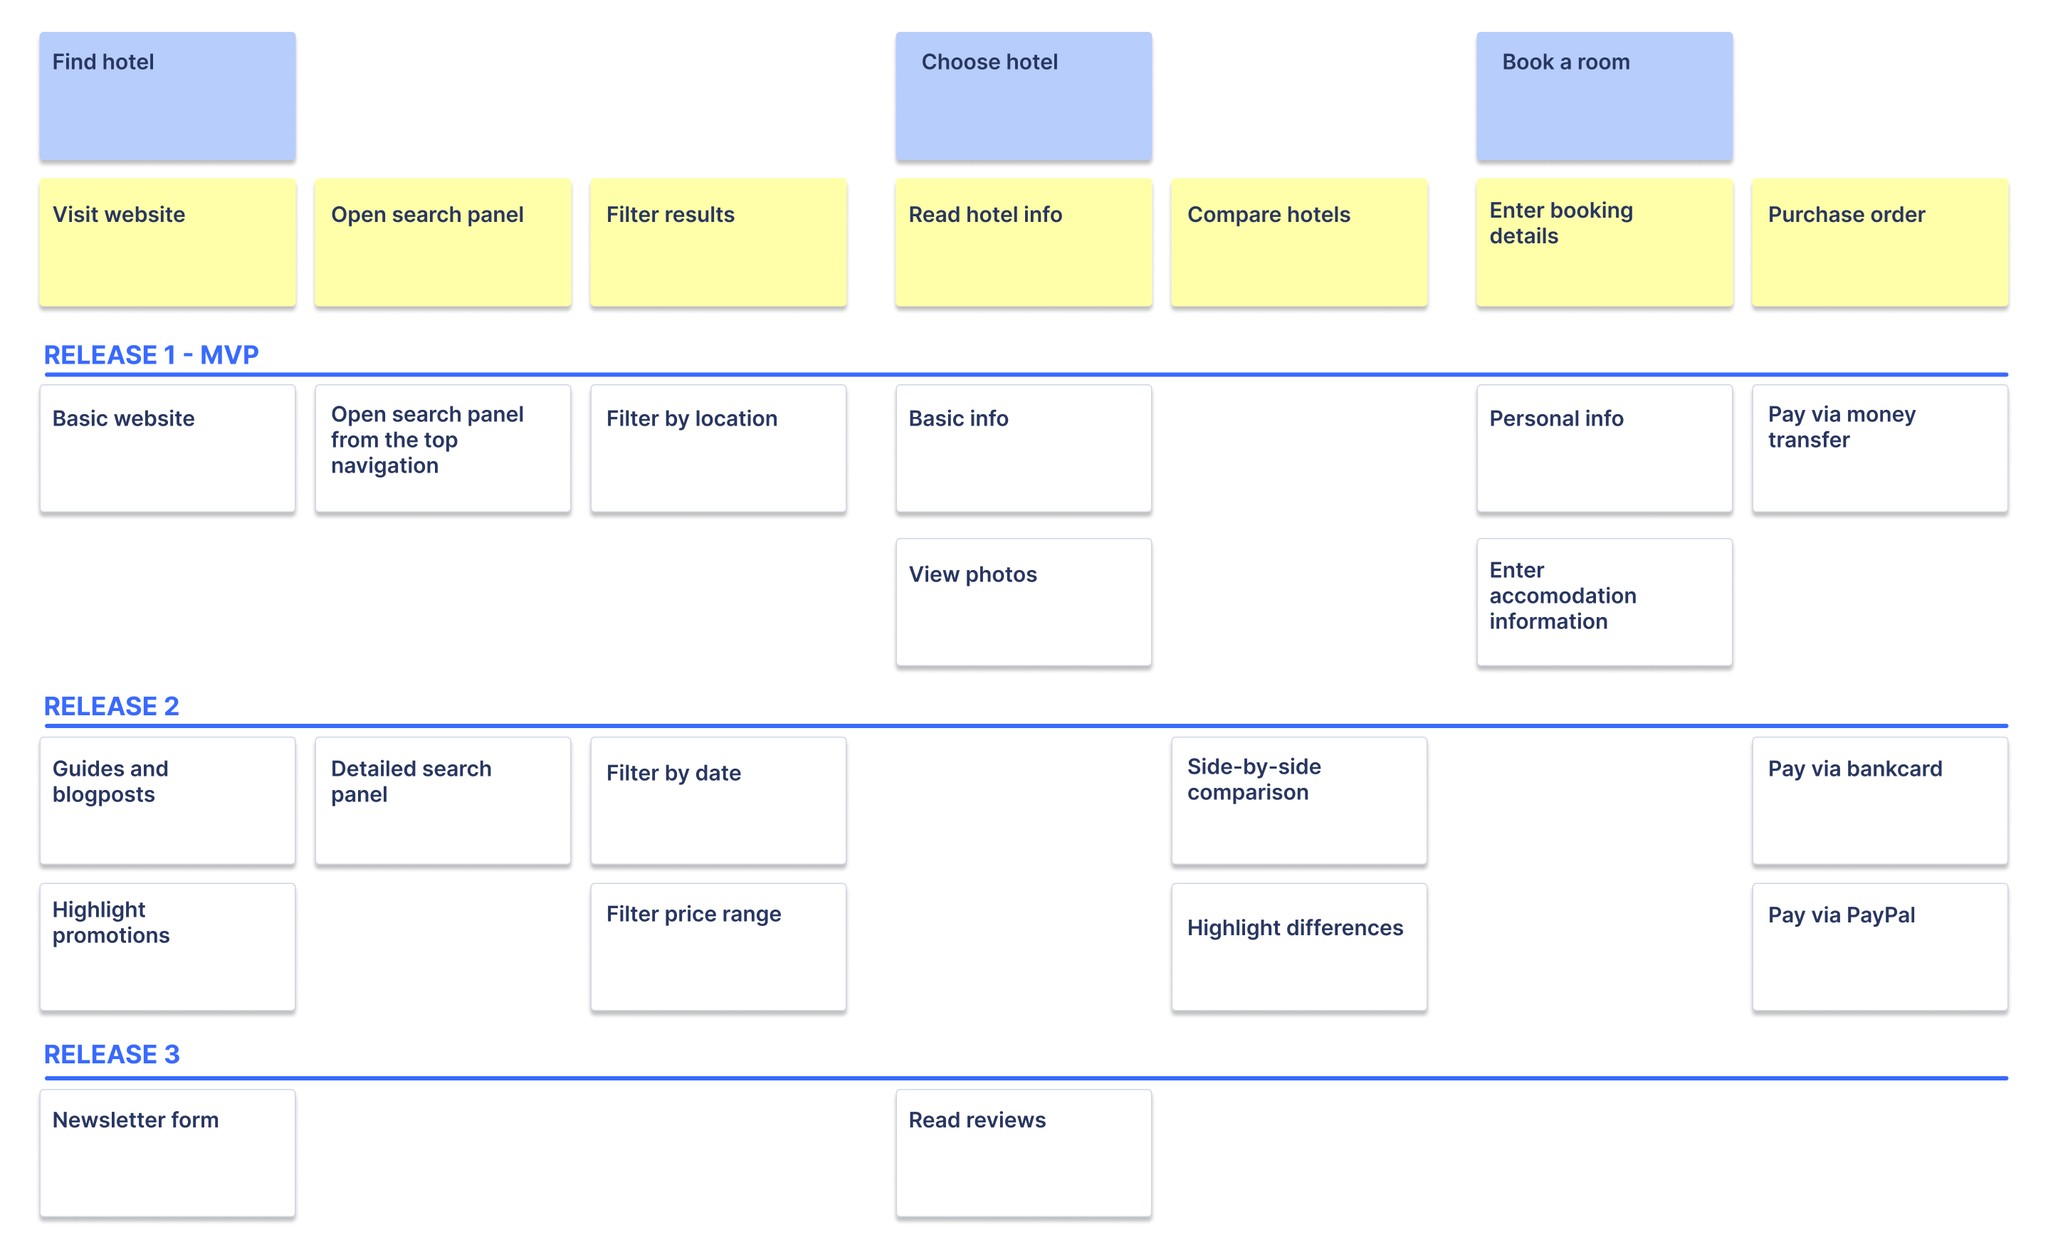
Step 6: Slice out the MVP
At the end of the user story mapping session, we should see what to develop first. So we need to specify the smallest working part of the product, the Minimum Viable Product. It's always hard to choose the fewest tasks for a marketable product.
Try to complete the user journey by beginning with the most common or easy-to-develop tasks. Just focus on completing at least one user journey. After that, try to organize the rest of the backlog into tangible pieces by drawing horizontal lines between cards.
Adding estimations to user stories lets you plan and schedule the development process release by release. This is one of the most important pieces of information, so that your customer or executive needs to calculate estimated delivery time and product details
Example
The client decided to launch the service as soon as possible by narrowing down our scope to the previously discussed user stories. So the very first release (MVP) contains only the Basic Website user story. The second release could be a marketing-focused release with the Highlight promotions and the Newsletter form. The blog engine with Tourist guide articles is assigned to the third release.
User story splitting techniques: How to break down large stories in agile development
In Agile development, working with large user stories (also known as epics) can slow down progress, make estimation difficult, and prevent teams from delivering value incrementally.
Splitting user stories into smaller, manageable pieces ensures faster development, more precise requirements, and continuous delivery while maintaining a smooth workflow.
1. Workflow Steps
Break down a user story by identifying each step in a workflow. This technique is proper when a feature involves multiple sequential actions.
Example:
User Story: As a user, I want to search for products on the e-commerce site.
Splits:
As a user, I want to see a search bar on the homepage.
As a user, I want to type my query into the search bar.
As a user, I want to see search suggestions as I type.
As a user, I want to submit my search and see a list of products.
2. Business Rules Variations
If a feature has multiple business rules, each variation can be handled as a separate user story.
Example:
User Story: As a user, I want to receive different discounts based on my membership level.
Splits:
As a basic member, I want to receive a 5% discount on purchases.
As a silver member, I want to receive a 10% discount on purchases.
As a gold member, I want to receive a 15% discount on purchases.
3. Data Variations
Split a user story based on different types of data that the feature needs to process.
Example:
User Story: As a user, I want to filter search results based on different criteria.
Splits:
As a user, I want to filter search results by price range.
As a user, I want to filter search results by rating.
As a user, I want to filter search results by category.
As a user, I want to filter search results by brand.
As a user, I want to filter search results by availability (in stock/out of stock).
4. User Roles
A single feature might behave differently depending on the user’s role, so it can be split accordingly.
Example:
User Story: As a user, I want to manage my account settings.
Splits:
As a standard user, I want to update my personal information.
As an admin, I want to update any user's account settings.
As a guest, I want to view account settings but not edit them.
5. Operations (CRUD)
Many features involve Create, Read, Update, and Delete (CRUD) operations. These can be split into separate user stories.
Example:
User Story: As an admin, I want to manage user accounts.
Splits:
As an admin, I want to create new user accounts.
As an admin, I want to view a list of user accounts.
As an admin, I want to update user account details.
As an admin, I want to delete user accounts.
6. Happy Path and Edge Cases
Separate the happy path (the most common and successful scenario) from edge cases (alternative paths or errors).
Example:
User Story: As a user, I want to reset my password if I forget it.
Splits:
As a user, I want to reset my password successfully using my email.
As a user, I want to receive an error message if I enter an invalid email.
As a user, I want to receive a notification if my reset link expires.
Integrating user story mapping with other agile practices
User story mapping is a powerful technique on its own, but its true potential is realized when integrated with other Agile practices. Combining user story mapping with methodologies like Scrum, Kanban, and Continuous Delivery can enhance collaboration, streamline workflows, and ensure a user-centric approach throughout the development process.
Scrum Integration
With its structured framework of sprints and roles, Scrum pairs well with user story mapping. Here's how they can work together:
Sprint Planning: Use the user story map to plan sprints. The map provides a visual product backlog, helping the team select the most important stories for the upcoming sprint. This ensures that the highest priority tasks are always in focus and aligns with the overall customer journey.
Daily Stand-ups: Refer to the user story map to track progress during daily stand-ups. This visual tool helps team members see where they are in the user journey and understand how their tasks contribute to the overall goals.
Sprint Reviews and Retrospectives: Use the story map during sprint reviews to demonstrate completed work and gather feedback. In retrospect, the map can help identify bottlenecks or areas for improvement in the workflow.
Continuous Delivery Integration
Continuous Delivery (CD) aims for frequent, reliable software releases, and integrating it with user story mapping ensures a seamless transition from planning to deployment:
Release Planning: Use the user story map to define release scopes. Identify which stories constitute a Minimum Viable Product (MVP) and subsequent releases, ensuring that each release delivers coherent and valuable user experiences.
Automated Testing: Link user stories to automated tests to ensure every story meets its acceptance criteria before deployment. This maintains high quality and reliability in every release.
Feedback Loops: Continuous Delivery thrives on quick feedback. Use the story map to gather user feedback after each release, refining and adjusting stories and priorities based on real-world usage and user input.
User story mapping in distributed teams
Story mapping is a highly visual and collaborative technique, making it a powerful tool for distributed teams. It helps bridge the gap created by physical distance by providing a shared, interactive space for brainstorming, planning, and aligning around user goals. In a remote context, digital story mapping tools like StoriesOnBoard enable teams to build and iterate on the map together in real-time.
Key Benefits:
Shared Understanding: Everyone sees the same map, reducing miscommunication.
Improved Engagement: Visual elements (colored cards, tags, etc) keep remote participants engaged.
Asynchronous Collaboration: Team members can contribute regardless of time zones.
Tips for Success:
Use Video Conferencing: Combine the map with live discussions.
Set Clear Guidelines: Define roles and rules for editing the map to avoid confusion.
Encourage Feedback: Invite remote team members to add comments, notes, or concerns directly on the map.
By leveraging these best practices, distributed teams can utilize story mapping to maintain clarity, ensure alignment, and keep everyone focused on delivering user value despite being geographically dispersed.
User story mapping templates

The origin of user story mapping
Jeff Patton introduced user story mapping in the early 2000s as a response to traditional linear backlogs that often failed to convey a complete picture of user journeys. Story mapping allows teams to build products that prioritize user experience. It organizes user stories in a two-dimensional grid, showing the workflow and priority, making it easier to visualize the bigger picture.
Over time, the method gained popularity, especially within Agile frameworks, as a powerful tool for planning and communication.
Initially, story mapping was primarily used to plan features and releases. However, as the Agile movement grew, teams began to leverage it for more collaborative planning, cross-functional alignment, and as a visual tool to manage complexity. It has since become a staple practice, helping organizations ensure that every team member understands the product vision and focuses on delivering user value.
Unleash the power of StoriesOnBoard AI
Brainstorm user stories
Collect acceptance criteria
List user goals
Map user steps
Collect subtasks
Write technical requirements
Write PRD
Write release summary
Craft release announcement
Free AI product managmenet tools
Common mistakes, pitfails in story mapping
How to do story mapping?

Mastering user story writing
The basic techniques and tools to write excellent user stories.
How to Prepare for a Story Mapping Workshop?
Organizing and facilitating a story-mapping workshop can be a challenging task.
Story Mapping With AI
Learn user story generation and create a story map outline with AI assistance.
Learn more ->

User Story Templates vs. AI
Choosing the right approach can impact the success of your project
Useful resources

Unleash the power of
user story mapping
StoriesOnBoard transforms your team’s collaborative workflow.
No more sticky notes, just a seamless planning process at your fingertips.
98.000
teams
160.000
story maps
200.000
satisfied users
What is user story mapping
Story mapping is a collaborative and visual technique in which agile teams work together to plan new products or new product features.
How do you conduct a user story mapping session?
A story mapping session is typically a workshop where all Agile team members contribute to the creation of a story map by creating and discussing the user stories in the map and can see the general direction of feature development in the near future.
What does a user story map consist of?
The story map consists of the backbone of the product, user activities, user tasks, user stories and releases, represented in a two-dimensional visual format.
Who created user story mapping? What is the history of user story mapping?
Jeff Patton started using story mapping as a concept that complements the traditional backlog of user stories, providing a visual overview of the product in development through a simple two-dimensional structure.
What is the user story mapping process?
The user story mapping process usually consists of the following steps:
1. Discovering project goals
2. User persona creation
3. User journey mapping
4. Coming up with solutions
5. Prioritizing
6. Slicing out the MVP and the release structure
What is a user story workshop?
The user stories workshop is the same as the story mapping session, where all members of the agile team contribute to the development of the story map, the prioritization of stories, and the discussion of the detailed functionality of each user story. The user story workshop also gives the agile teams the opportunity to clarify doubts and resolve conflicting views.
Why is story mapping important?
Mapping the story is important because it is extremely useful in providing a visual and two-dimensional picture of the full range of product features while allowing team members to see which features are being worked on in which release.
How do you make a physical story map?
To physically create the history map, start by drawing a horizontal line on a whiteboard or large piece of paper, on which you first write the most important user goals/activities from left to right.
What is the user story in Agile?
A user story in Agile is an elementary piece of a feature or product requirement that development teams can efficiently prioritize and estimate.
How to write a good user story?
A good user story is easy to read, written from the user's perspective, with a clear purpose and benefits, and clear acceptance criteria.
What are the acceptance criteria for a user story?
User story acceptance criteria describe what exactly qualifies or marks a user story as successfully implemented. In turn, it is the testing criteria that will ultimately result in the acceptance (or failure) of the implemented user story by the end users.
What can story mapping be used for?
The story map is used in conjunction with traditional agile development tools and as a tool to increase their effectiveness.
A traditional backlog is a linear tool that contains linearly defined epics, user stories that are difficult to create, especially as the product evolves or becomes more complex.
Story mapping is very effective because it is visual and gives all stakeholders an easy way to understand the big picture as quickly as possible.
Who writes the user stories?
The user story is written collaboratively by the agile team as it is developed to serve the needs of the end users, with different agile roles such as Product Manager, Product Owner, development teams, QA teams, and Scrum Master contributing in their own way to complete the story.
Who should attend a story mapping session?
Typically, a story mapping session is attended by all agile teams or roles, including but not limited to end users, Product Managers, Product Owners, Business Analysts, Architects, Developers, QA teams, Design teams, Project Managers or Scrum Masters.
What is the user persona on the story map?
User personas are fictional and generalised characters that represent the target user group of the product or solution being built. They share common characteristics/patterns/beliefs. Typically associated with an image of a representative persona. For example, the target user of a given product is a working professional who is in a certain age range, has a certain salary range, and has a certain hobby.
What are releases?
Releases are pieces of functionality, user stories that end users can use at the end of the release or at the end of the release timeline.
The process of slicing the backlog into releases is an iterative activity, where the prioritized user stories from the backlog are put into releases. It also takes into account dependencies and other limits between user stories.
How to brainstorm user stories?
The brainstorming of user stories can be carried out using the following best practice techniques, such as raising ideas, ranking ideas and then flagging the most useful ideas for further reflection.
Why is prioritization important when working with user stories on the story map?
Prioritization is key when working with the user stories in the story map, as it helps stakeholders reach a consensus on which requirements are more valuable and feasible than others.
The goal of creating the backbone of the product is to design the core features or user activities of the product being built in such a way that it represents the customer experience/journey of the product on the horizontal axis.
How to convert a story map into a conventional product backlog?
Typically, the history map can be converted into a traditional product list by integrating the right tools such as Jira, Trello, Azure DevOps.
Such integration supports the mapping of user activities and epics to the epics of the traditional product map, while user stories are mapped to the corresponding user activities/epics.
What is the MVP release?
The MVP (Minimum Viable Product) or MVP release is a combination of user stories from different epics that give customers a marketable slice of product minimalism. MVP also facilitates the collection of early feedback from users.
What is the difference between epics and user stories?
In agile software development, epics are a summary of a feature of the product. User stories are often part of the epic and describe specific user actions that need to happen to achieve a larger goal.